

In sync with our safety series of blogs, specifically Safety Systems on Staple Guns and Nail Guns. Along with 10 important tips for Safer use of Staplers and Nailers.
I wanted now to cover a topic which is raised many times by our customers. I don’t want to get too detailed, but I’d like to cover some basic fundamentals so you can care for and identify some basic problems that may occur with your stapler.
First and foremost, before looking at the stapler please ensure you have your air pressure is set correctly and as the air is as dry as possible. I remember talking to a customer via telephone to try and establish why the stapler wasn’t operating only to discover (after some considerable time) the compressor wasn’t switched on – lesson for us all – when troubleshooting – Start with the basics!
An ideal air pressure should be about 90psi. (6.21 bar) Too high a pressure will create unnecessary wear and tear to the Damper/Bumper which will have to to absorb this extra energy. This may cause it to fail a lot earlier in its life cycle. Too low and the Piston/Driver assembly may not fully return – which in turn does not allow the staples to feed causing the stapler to cycle but not fire out a staple.
Try and keep the air as dry as possible, moisture in the air when compressed will condense in the air receiver (hot water vapour condenses when it comes into contact with the relatively cool tank) and should be drained at regular intervals. Water will eventually travel to the stapler then emulsify (or mix, to me and you) with the oil and cause operating faults. Although driers and filters can be fitted, draining the tank regularly will help. Personally, I drain our workshop compressor at the end of every working day.
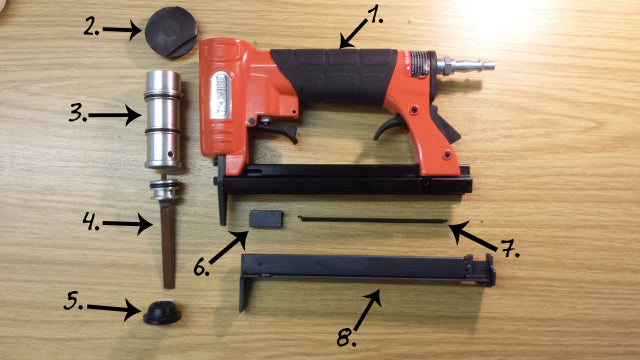
The Anatomy of a Stapler
In the above drawing, I have identified the basic parts of any air operated stapler with a brief Chuck-style description…….
- Main Stapler Body – Basically this is an air reservoir. Housing the trigger assembly and operating piston(4) and cylinder(3)
- Cylinder Head – The head assembly can be either screwed into the main body or attached with bolts – it keeps the insides, in!
- Cylinder – Housing the Piston/Driver assembly.
- Piston/Driver Assembly – Through each stapling cycle this Piston/Driver assembly will travel up and down the cylinder. The piston will have either a Rubber O Ring or Carbon Ring dependant on manufacturer.
- Damper – Based at the bottom of the Cylinder this rubber piece is where the Piston/Driver comes to rest and is sometimes referred to as the Bumper.
- Feed Shoe – This is the part that pushes the staples along the magazine towards the Piston/Driver Assembly and is sometimes called…..……….wait for it………….the Pusher!!
- Feed Spring – Attached to the Magazine and Feed Shoe the spring is put into tension as staples are loaded pulling the Feed Shoe towards the stapler nose.
- Magazine Housing – Complete assembly that accommodates the Feed Shoe, Feed Spring and staples.
Steve (the gaffer) has done a video below just shows you some basic service and maintenance tips.
Proper care of your stapler will give you many years of service and make sure when making this type of purchase that future spares are available.
Use air tool oil and a use a recommended O Ring lubricant for best results. Inspect all the parts and clean and lubricate where necessary pay particular attention to the Piston O Ring and Damper and replace if damaged or worn.
- Worn piston O Ring will cause lack of power and poor driver return resulting in a possible staple misfire.
- Worn or damaged Damper will cause the Piston/Driver assembly to protrude further out of the nose of the tool and possibly jam. NB. Breaking up of this part causes debris to potentially inhibit the Piston/Driver cycle again causing staple misfire. I’d advise to replace this part if showing any signs of break up or wear.
If you dismantle your stapler and find a problem, the basic parts diagram will help to understand which parts may need repair or ordering. When dismantling your stapler, have the drawing to hand so you can reference part numbers and (more importantly) know which order everything goes back!! – And make sure you have a tidy bench – you don’t want to put more bits back than what came out!
I hope that we have covered some interesting points and don’t forget we are always here to help and advise.
Need a new staple gun? we select the best key brands including Stanley Bostitch, Arrow, Tacwise, BeA, Omer rapid and more:
Until next week’s posting…………….
Take Care
Get your personalised weekly Tool and Industry News Here

©